|
Wireless Sensor Networks TutorialBack to main pageIntroductionIf you are reading this, you have hopefully attended the introductory session where you received
CD:\ will be the root directory of your CD drive. In other cases we will direct you to appropriate online resources for downloading software.
InstallationFor the sake of this tutorial, we will be working in Windows XP. It is possible to work with BTnodes in Linux or even Mac OS X, but this typically requires a very up-to-date system (e.g., kernel 2.6.12 and above for Linux). For the Windows platform, most of the installation steps are described below. For more information, as well as information about installation on Linux and Mac OS X systems, see the GettingStarted section on the official BTnode site.CygwinWe strongly recommend to install Cygwin on your Windows machine. The main reason in this context is the command line building toolmake that comes with Cygwin and that we require to compile our C projects. There are other possibilities, but here we will stick with Cygwin. You can download it from http://www.cygwin.com, and make sure to select the make package during installation.
USB DriverIn order to communicate with the BTnode once it is installed and is running a program, we use an extension board with a Silabs CP2101 USB connection that allows us to attach the device to the computer. For Windows, this requires us to install the appropriate drivers that create a virtual COM (serial) port to speak to the BTnode. Update: If prompted for a location for the driver, choose the directoryCD:\tools\silabscp210x_driver\WIN_PREINSTALL.
WinAVRThe BTnode is based on the ATmega128 from the Atmel AVR series. In order to compile programs for this platform and to upload code to the device, we need to install WinAVR, which can be found atCD:\tools\avr_win_\WinAVR-20060125-install.exe. This installer automatically inserts the WinAVR directory into the path which means we can access the avr-gcc compiler from any shell location and from inside Eclipse.
To upload code to the device, we will use a tool called uisp.exe. For simplicity, we will place this in the same directory as avr-gcc.exe, usually this is C:\WinAVR\bin. This file can be found at CD:\tools\avr_win\uisp_for_WinAVR-20060125.zip.
Important: If you have installed cygwin, you will need to remove the three cygwin dlls supplied with WinAVR. They can be found in the same directory as above and are called cyg*.dll If you have not installed cygwin, do not remove them.
EclipseWe will use the Eclipse IDE (Integrated Development Environment) to develop our programs. Eclipse was originally designed for Java programming and is also written in Java. Hence it requires a JRE (Java Runtime Environment) to be installed. If this is not the case, install this fromCD:\tools\java\j2sdk-1_4_2_06-windows-i586-p.exe. The latest JRE is available from http://www.java.com.
Eclipse can be found at CD:\tools\eclipse\eclipse-SDK-3.1.2-win32.zip. Extract this archive to your location of choice. This can be C:\Program Files or even C:\, which we will use here.
In order to create and maintain C or C++ projects, you need to install an Eclipse plugin called CDT (C/C++ Development Tools). This can be done by directing the Eclipse Update Manager to the CDT update archive or manually by downloading the package (CD:\tools\eclipse\org.eclipse.cdt.sdk-3.0.2-win32.x86.zip) and unzipping it in the same location as previously.
Obtaining the OSNow we have installed everything we need to be able to write, compile and upload programs to our BTnode. It is time to get the source code for the operating system we need to compile our code against and some sample programs to help us understand how to program the BTnode. The ethernut project is an open source hardware and software project for building tiny embedded ethernet devices. The BTnode hardware is slightly different, and hence it requires an altered OS. However, ethernut forms the core of our OS. The BTnut project defines a layer on top ofethernut that forms our OS. Locate the source code at CD:\BTnut\btnut_system_1.6.tar.gz and extract this to your workspace (here we will assume C:\workspace).
Creating Eclipse ProjectsNow we have all the source code we need, but before we can program, we need to create the corresponding projects in Eclipse. Therefore open Eclipse (with theCDT plugin installed). Set the workspace to whatever you have defined. Open File => New => Project, then select C => Standard Make C Project, and click Next. Enter btnut and click Finish. Eclipse will then ask you to switch to the C Perspective. Answer yes. Now, open File => New => Standard Make C Project, enter nut and press Finish. You should have one project folder for btnut and one for nut.
Next, expand the btnut project on the left side and open the app/bt-cmd folder. Here, open the bt-cmd.c file. Look at the source code - this is a BTnode application.
CompilingIn order to link our applications against the system libraries, we will need to compile the entire operating system. In order to do this directly from within Eclipse, please refer to Section 2.3 of the GettingStarted Guide. We will compile from command line. For this purpose, navigate your Cygwin shell to thebtnut directory in your workspace and enter make. This will take some time and should look as follows:
user@host /cygdrive/c/workspace/btnut
$ make
make -C btnode install
make[1]: Entering directory `/cygdrive/c/workspace/btnut/btnode'
make -C bt install
make[2]: Entering directory `/cygdrive/c/workspace/btnut/btnode/bt'
avr-gcc -c -mmcu=atmega128 -Os -Wall
...
avr-size uart-suart.btnode3.elf
   text    data     bss     dec     hex filename
  14930     418     130   15478    3c76 uart-suart.btnode3.elf
avr-objcopy -O ihex uart-suart.btnode3.elf uart-suart.btnode3.hex
rm uart-suart.btnode3.elf
make[2]: Leaving directory `/cygdrive/c/workspace/btnut/app/uart-suart'
make[1]: Leaving directory `/cygdrive/c/workspace/btnut/app'

user@host /cygdrive/c/workspace/btnut
$
Now we have compiled the btnut system, including all the applications that are already included. These applications are compiled in binary format suitable for the BTnode (*.hex).
Uploading our first program to the BTnodeFinally, we need to know how to upload application code to the BTnode. For this purpose you need to have the BTnode connected to your computer via USB and you need to know which virtual COM port it is using. You can use the script list_usb2uart.vbs from CD:\tools\avr_win to acquire the COM-Port (COMx) of the USB program.
There is a special
If you have an older version of the btnut sources than the CD-ROM's
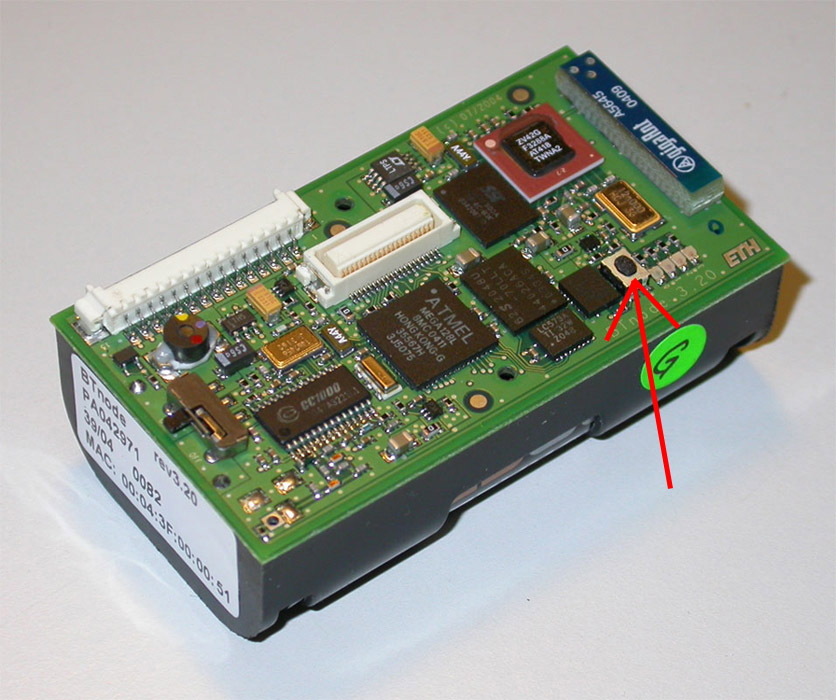
1.6, you might need to also look for the make burn btnode3, which will trigger the uisp uploader to send the created binary file to the BTnode. This is a bit tricky, as you need to press the reset button on the BTnode (use this picture of the BTnode reset button for guidance), and release it when the uploader is ready to send the data. If all goes well, it should look like this:
user@host /cygdrive/c/workspace/btnut/app/bt-cmd
$ make burn btnode3
make burn.btnode3
make[1]: Entering directory `/cygdrive/c/workspace/btnut/app/bt-cmd'
uisp -dprog=stk500 -dpart=atmega128 -dserial=COM3 --upload if=bt-cmd.btnode3.hex
Firmware Version: 1.15
Atmel AVR ATmega128 is found.
Firmware Version: 1.15
Uploading: flash
make[1]: Leaving directory `/cygdrive/c/workspace/btnut/app/bt-cmd'
make: Nothing to be done for `btnode3'.
Congratulations, you have just uploaded your first program to the BTnode! Note that some (older) versions of the bootloader report a (spurious) [LPM] error. You can safely ignore this -- your program did upload correctly! However, if you get a [VP 1] error instead (see below), then just try again -- it is quite normal that it takes a number of trials until this "press, trigger and release" process works out. user@host /cygdrive/c/workspace/btnut/app/bt-cmd $ make burn btnode3 make burn.btnode3 make[1]: Entering directory `/cygdrive/c/workspace/btnut/app/bt-cmd' uisp -dprog=stk500 -dpart=atmega128 -dserial=COM3 --upload if=bt-cmd.btnode3.hex [VP 1] Device is not responding correctly. make[1]: *** [burn.btnode3] Error 2 make[1]: Leaving directory `/cygdrive/c/workspace/btnut/app/bt-cmd' make: *** [burn] Error 2If you continue getting this error, try out different BTnodes and see whether the problem persists. If it does, your BTnode might be defective -- please let Jonas Wolf know. Communicating With Your ProgramNow the program is running on the BTnode, which is indicated by the blue blinking LED. In order to see what the program is doing, we need to access its terminal, again using the virtual COM port. For this purpose, we will use HyperTerminal, which you can find in the start menu underStart => Programs => Accessories => Communications => HyperTerminal. First, it will prompt you for a connection name, and you can choose whatever you like. Next, you need to select the appropriate COM port. In the following dialog, you need to set the following connection settings:
bt-cmd interface like this:
# --------------------------------------------
# Welcome to BTnut (c) 2005 ETH Zurich
# bt-cmd program version: 20060112-0913
# --------------------------------------------
booting bluetooth module... ok.
hit tab twice for a list of commands
[bt-cmd@btnode]$
Starting up bluetooth takes a few seconds, this is normal. From the command prompt, you can hit tab twice to find out all the possible commands. For now, we will be content with checking that the MAC address of the device is indeed the same as the one on the label on the side of the BTnode. Therefore, enter addr and compare the two.
[bt-cmd@btnode]$addr
Local bt_addr: 00:04:3f:00:01:2f (error code=0)
If this is successful, you are finished. You have now installed all the necessary tools to be able to write programs, compile them, upload them to the device, and interact with them. Next time, we will expand on this and write our own little programs. |
|
|