|
Wireless Sensor Networks TutorialBack to main pageIntroductionIf you are reading this, you have hopefully attended the introductory session where you received
InstallationFor the sake of this tutorial, we will be working in Windows XP. It is also possible to work with BTnodes in Linux or even Mac OS X*, though you will need a reasonably up-to-date system (e.g., kernel 2.6.12 and above for Linux). For the Windows platform, most of the installation steps are described below - note that you need administrator privileges for the installation process. For more information, as well as information about installation on Linux and Mac OS X systems, see the GettingStarted section on the official BTnode site.* See the problems regarding the missing USB Driver for the new Intel-Macs below... CygwinWe strongly recommend to install Cygwin on your Windows machine. The main reason in this context is the command line building toolmake that comes with Cygwin and that we require to compile our C projects. There are other possibilities, but here we will stick with Cygwin. You can download it from http://www.cygwin.com, and make sure to select the make package during installation.
USB DriverIn order to communicate with the BTnode once it is installed and is running a program, we use an extension board with a Silabs CP2101 USB connection that allows us to attach the device to the computer. For Windows, this requires us to install the appropriate drivers that create a virtual COM port (aka serial port) to communicate with the BTnode: Download it here and install it.PS: Linux should have support for the CP2101 built-in, so things should work out-of-the box. For Intel-based Macs, however, there is no CP2101 driver yet! If you want to use an Intel-based Mac, you will need to install the above Windows-Driver either in a virtual machine, or use Boot-Camp to boot into a Windows-Installation (both approaches have been reported to work!)... WinAVRThe BTnode is based on the ATmega128 from the Atmel AVR series. In order to compile programs for this platform and to upload code to the device, we need to install WinAVR (release 20060125), which can be found here. This installer automatically inserts the WinAVR directory into the path which means we can access theavr-gcc compiler from any shell location and from
inside Eclipse.
To upload code to the device, we will use a tool called avrdude.exe.
While it is included with WinAVR, we need a more recent version.
Update: The avrdude version 5.3.1 seems to have some problems.
Download a specially patched avrdude 5.1 here
and unzip the contents to your WinAVR\bin directory, overwriting
the existing files!
Important: WinAVR comes with a set of DLLs that will conflict with your Cygwin installation.
Since we will be using the Cygwin-versions of those libraries, you will need to remove the ones that
came with WinAVR. They can be found in the WinAVR\bin directory and
are called cyg*.dll.
EclipseWe suggest using the Eclipse IDE 3.2 (Integrated Development Environment) to develop BTnode programs. If you want to use your favourite text editor, then just skip the Eclipse-related instructions below.
Eclipse was originally
designed for Java programming and is also written in Java. Hence it requires
a JRE (Java Runtime Environment) to be installed. The latest JRE is available
from http://www.java.com.
Eclipse 3.2 can be downloaded from www.eclipse.org.
Extract the zip archive to your location of choice. This can be C:\workspace). Note: To extract a tgz-file, you can use your Cygwin installation!
Simply save the above file in C:\workspace, start a Cygwin shell, and issue:
Creating Eclipse Projects (if you use Eclipse)Now we have all the source code we need, but before we can program, we need to create the corresponding projects in Eclipse. Therefore open Eclipse (with theCDT
plugin installed). Set the workspace to whatever you have defined. Open
File => New => Project, then select C => Standard Make C Project,
and click Next. Enter btnut and click Finish.
Eclipse will then ask you to switch to the C Perspective. Answer yes. Now,
open File => New => Standard Make C Project, enter nut
and press Finish. You should have one project folder for btnut
and one for nut. Next, expand the btnut project on the left
side and open the app/bt-cmd folder. Here, open the bt-cmd.c file.
Look at the source code - this is a BTnode application.
PS: If you rather use your favorite text editor to program, you do not need any of the above steps - this is just if you like to use the IDE-capabilities of Eclipse... CompilingIn order to link our applications against the system libraries, we will need to compile the entire operating system. In order to do this directly from within Eclipse, please refer to Section 2.3 of the GettingStarted Guide. We will compile from command line. For this purpose, navigate your Cygwin shell to thebtnut directory by typing cd /cygdrive/c/workspace/btnut
and start the build process by entering make. This will take some time
and should look as follows:
user@host:/cygdrive/c/workspace/btnut
$ make
make -C btnode install
make[1]: Entering directory `/cygdrive/c/workspace/btnut/btnode'
make -C bt install
make[2]: Entering directory `/cygdrive/c/workspace/btnut/btnode/bt'
avr-gcc -c -mmcu=atmega128 -Os -Wall
...

avr-size main.btnode3.elf
   text    data     bss     dec     hex filename
  55584    1192     180   56956    de7c main.btnode3.elf
avr-objcopy -O ihex main.btnode3.elf main.btnode3.hex
rm main.btnode3.elf
make[2]: Leaving directory `/cygdrive/c/workspace/btnut/app/template'
make[1]: Leaving directory `/cygdrive/c/workspace/btnut/app'
make -C doc doc
make[1]: Entering directory `/cygdrive/c/workspace/btnut/doc'
doxygen btnut.doxygen
sh: dot: command not found
sh: dot: command not found
sh: dot: command not found
sh: dot: command not found
sh: dot: command not found
sh: dot: command not found
make[1]: Leaving directory `/cygdrive/c/workspace/btnut/doc'
user@host:/cygdrive/c/workspace/btnut
$
Note: The tools doxygen and dot are only required for the building of the
documentation - it is okay if you do not have them installed (in fact, the building
process is faster when these tools are not installed.)
Now we have compiled the Configuring the Upload-PortFinally, we need to know how to upload application code to the BTnode. For this purpose you need to have the BTnode connected to your computer via USB and you need to know which virtual COM port it is using. You can use the script list_usb2uart.vbs to acquire the COM-Port (COMx) of the BTnode, or simply look at the Device-Manager (Start => Control Panel => System => Hardware => Device Manager => Ports) while
connecting a BTnode (the COM-port should appear/disappear automatically when you
connect/disconnect the BTnode).
There is a special
Look for the statement Uploading our first program to the BTnodeLet's upload one of the sample applications that are contained in the BTnut OS package. Change into thebtnut/app/bt-cmd directory, e.g.,
within the Cygwin shell. Then execute make burn btnode3, which
will trigger the avrdude uploader to send the created binary
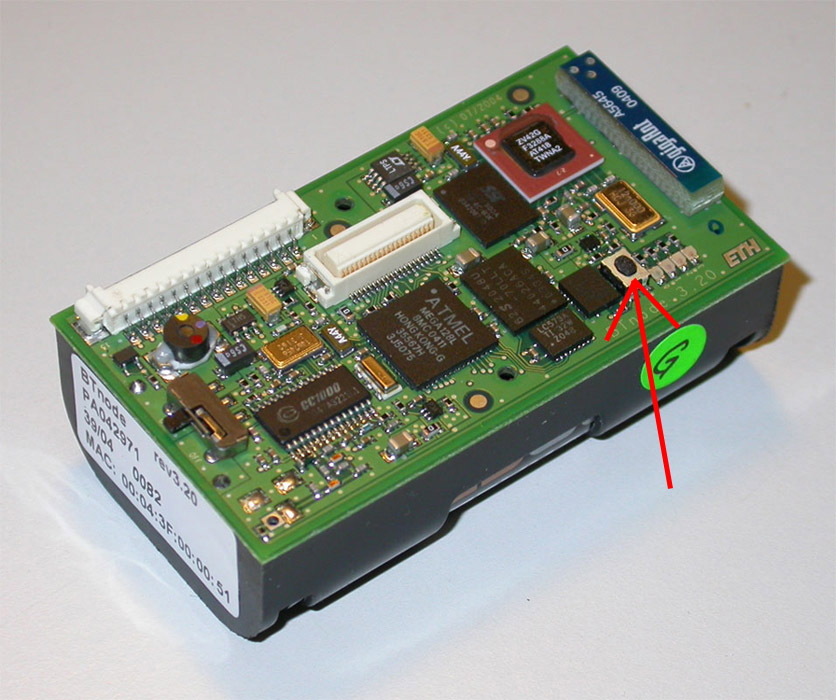
file to the BTnode. This is a bit tricky, as you need to press the reset
button on the BTnode (use this picture of the BTnode reset button for guidance), and release it when the uploader is ready to send the data. If all goes well, it should look like this:
user@host /cygdrive/c/workspace/btnut/app/bt-cmd
$ make burn btnode3
make burn.btnode3
make[1]: Entering directory `/cygdrive/c/workspace/WSNLab2007/btnut/app/bt-cmd'
avrdude -p m128 -c avrisp -P //./COM50 -s -U flash:w:bt-cmd.btnode3.hex:i

avrdude.exe: AVR device initialized and ready to accept instructions

Reading | ################################################## | 100% 0.00s

avrdude.exe: Device signature = 0x1e9702
avrdude.exe: NOTE: FLASH memory has been specified, an erase cycle will be performed
             To disable this feature, specify the -D option.
avrdude.exe: erasing chip
avrdude.exe: reading input file "bt-cmd.btnode3.hex"
avrdude.exe: writing flash (70460 bytes):

Writing | ################################################## | 100% 9.47s

avrdude.exe: 70460 bytes of flash written
avrdude.exe: verifying flash memory against bt-cmd.btnode3.hex:
avrdude.exe: load data flash data from input file bt-cmd.btnode3.hex:
avrdude.exe: input file bt-cmd.btnode3.hex contains 70460 bytes
avrdude.exe: reading on-chip flash data:

Reading | ################################################## | 100% 7.00s

avrdude.exe: verifying ...
avrdude.exe: 70460 bytes of flash verified

avrdude.exe: safemode: Fuses OK

avrdude.exe done.  Thank you.

make[1]: Leaving directory `/cygdrive/c/workspace/WSNLab2007/btnut/app/bt-cmd'
make: F"ur das Ziel >>btnode3<< ist nichts zu tun.
Congratulations, you have just uploaded your first program to the BTnode!
However, if you get a not in sync error instead (see below), then just try again
-- it is quite normal that it takes a number of trials until this "press,
trigger and release" process works out.
user@host /cygdrive/c/workspace/btnut/app/bt-cmd
$ make burn.btnode3
make[1]: Entering directory `/cygdrive/c/workspace/WSNLab2007/btnut/app/bt-cmd'
avrdude -p m128 -c avrisp -P //./COM50 -s -U flash:w:bt-cmd.btnode3.hex:i
avrdude.exe: stk500_getsync(): not in sync: resp=0xe6
avrdude.exe: stk500_disable(): protocol error, expect=0x14, resp=0x7e

avrdude.exe done.  Thank you.

make[1]: *** [burn.btnode3] Fehler 1
make[1]: Leaving directory `/cygdrive/c/workspace/WSNLab2007/btnut/app/bt-cmd'
make: *** [burn] Fehler 2
If you continue getting this error, try the tips at the end of this document. If this still does not help, try out different BTnodes and see whether the problem persists. If it does, your BTnode might be defective -- please let Benedikt Ostermaier know. Communicating With Your ProgramNow the program is running on the BTnode, which is indicated by the blue blinking LED. In order to see what the program is doing, we need to access its terminal, again using the virtual COM port. For this purpose, we will use HyperTerminal, which you can find in the start menu underStart => Programs => Accessories => Communications => HyperTerminal.
First, it will prompt you for a connection name, and you can choose whatever you like. Next,
you need to select the appropriate COM port. In the following dialog, you need to set the
following connection settings:
bt-cmd interface like this:
# ------------------------------------------------------
# Welcome to BTnut (c) 2006 ETH Zurich
# bt-cmd program version: 20070330-1204
# $Id: bt-cmd.c,v 1.48 2006/12/15 12:24:13 yuecelm Exp $
# running @ 7.3533 MHz, NutFreq=1024l Hz
# -----------------------------------------------------
booting Bluetooth module...
Bluetooth MAC address: 0004:3f00:0111
HCI version: 2 00C9 2 0012 003D
LMP features: 03 10 00 FF FF 05 F8 1B
Local name: 'ZeevoEmbeddedDevice'
hit tab twice for a list of commands
[bt-cmd@01:11]$
Starting up bluetooth takes a few seconds, this is normal. From the command prompt, you can hit tab twice to find out all the possible commands. For now, we will be content with checking that the MAC address of the device is indeed the same as the one on the label on the side of the BTnode. Therefore, enter bt addr and compare the two.
[bt-cmd@01:11]$ bt addr
Local bt_addr: 00:04:3f:00:01:11
If this is successful, you are finished. You have now installed all the necessary tools to be able to write programs, compile them, upload them to the device, and interact with them. If flashing fails under WinXP
|
|
|